Original recipe from Southern Living, *custom edited by Terri N. Bergman
This recipe was featured in Heart of Ohio Magazine in 2016 for a Valentine’s Day feature. Terri makes these cakes and shares them with love every year. This is one of her most-requested recipes and she shares it with you today so you can make it for those you love!
CHEESECAKE LAYERS
2 (8”) round, aluminum foil cake pans
1 (2oz) package white chocolate morsels
5 (8oz) packages cream cheese softened
1 cup granulated sugar
2 large eggs
1 Tbsp vanilla extract
RED VELVET LAYERS
1 cup butter, softened
2 1/2 cups granulated sugar
6 large eggs
3 cups all-purpose flour
3 Tbsp unsweetened cocoa
1/2 tsp baking soda
1/2 tsp Pummull Spice* or cinnamon (optional)
1 tsp finely crushed pink peppercorns (optional)
1 tsp instant espresso or coffee granules (optional)
1 (8oz) container sour cream
2 tsp vanilla extract
2 (1 oz) bottles red liquid food coloring
3 (8”) aluminum foil cake pans
WHITE CHOCOLATE FROSTING
4 oz white chocolate morsels
1/2 cup boiling water
1 cup butter, softened
1 (32oz) pkg powdered sugar
1/2 tsp table salt
GARNISHES
White chocolate hearts and leaves made with piped melted chocolate
Fresh raspberries or cranberries (optional)
GLAZE RED VELVET CAKE TOPS (optional)
1 jar seedless raspberry jam warmed in microwave with 1 Tbsp Chambord liqueur, or water. This is a wonderful addition to seal cake tops when cool and enhance and deepen flavor. Use sparingly: spread 1 Tbsp on each cake top prior to assembly.
PREPARATION:
Cheesecake Layers
1) Preheat oven to 300 degrees. Line pans with aluminum foil, allowing 3 inches to extend over sides. Lightly grease foil or spray with cooking oil.
2) Microwave white chocolate morsels in a microwave-safe bowl according to package directions. Let cool 10 minutes.
3) Beat cream cheese and melted chocolate at medium speed with an electric mixer until creamy. Gradually add 1 cup sugar, beating well. Add 2 eggs, beating just until yellow disappears. Stir in vanilla then pour into prepared pans.
4) Bake at 300 degrees for 30 to 35 minutes or until almost set. Turn oven off. Let cheesecakes stand in oven, with door closed, for 30 minutes. Remove from oven and let cool completely. Cover and chill 8 hours, or freeze for 24 – 48 hours.
Red Velvet Layers
1) Preheat oven to 350 degrees. Beat 1 cup butter at medium speed with electric mixer until creamy. Gradually add 2 1/2 cups sugar. (Optional) Add sugar with Pummel Spice, finely crushed pink peppercorns and espresso granules. Add 6 eggs, 1 at a time, beating just until blended after each addition.
2) Stir together flour, unsweetened cocoa powder, and baking soda. Add to butter mixture alternately with sour cream. Beat at low speed just until blended after each addition. Stir in 2 tsp vanilla. Carefully stir in red food coloring. Evenly pour batter into the 3 greased and floured same 8” foil pans as above.
3) Bake at 350 degrees for 22 to 26 minutes, or until a wooden pick inserted in center comes out clean. Cool in pans on wire racks 10 minutes. Remove cake from pans and move to wire racks to cool completely (about 1 hour). These cakes can be prepared and frozen with cheesecake or cooled in refrigerator.
Frosting
1) Whisk together chocolate and . cup boiling water until chocolate melts. Let cool 20 minutes, then chill 30 minutes, stirring to keep the mixture smooth and liquid.
2) Beat 1 cup butter and chilled chocolate at low speed until blended. Beat at medium speed 1 minute. Increase speed to high, beat 1-2 minutes until smooth and fluffy. Gradually add powdered sugar and salt, beating at low speed until blended. Increase speed to high and beat 1-2 minutes or until smooth and fluffy.
Assemble
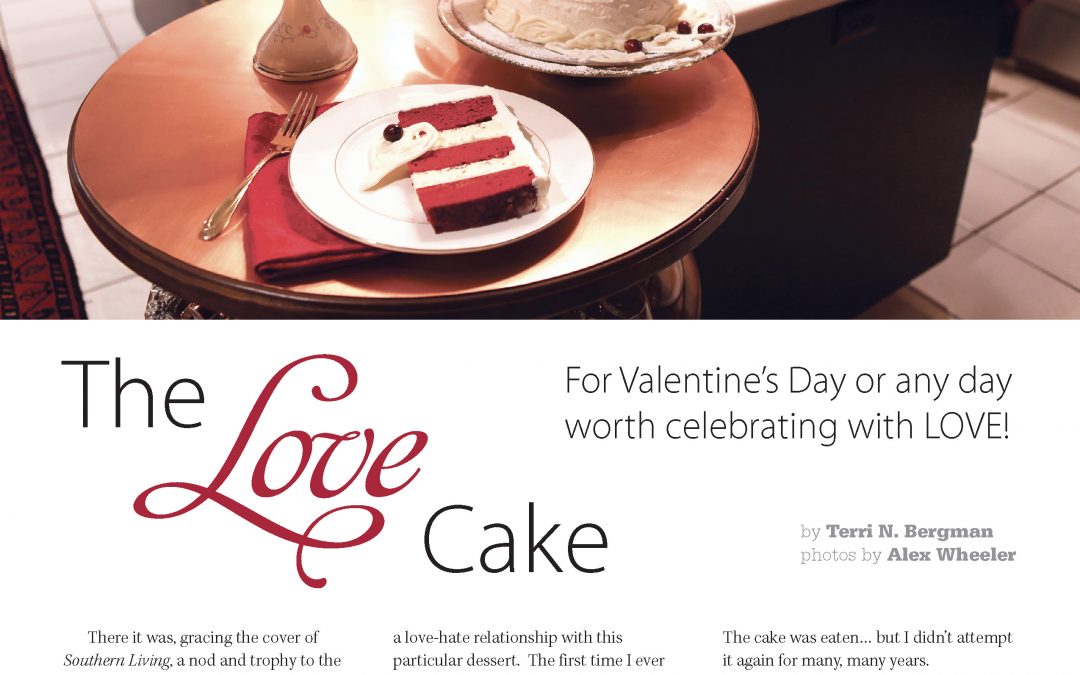
1) Place 1 layer red velvet on a serving platter. Top with 1 layer cheesecake. Repeat with remaining layers of red velvet and cheesecake, alternating and ending with red velvet on top. Spread top and sides of cake with white chocolate frosting. I like to lightly frost, chill or place in the freezer, and then generously frost again. This seals in red cake crumbs so the finished product is snowy white!
2) Garnish as desired. Remember you can pipe your own leaves and hearts, or garnish with melted white chocolate, that has been piped. If you don’t have a piping kit, refrigerate some frosting in a Ziploc plastic bag and then snip the corner to create a piping tool.
3) Admire your creation, then call in your best family and friends, slice and enjoy!


